AWS dropped so many serverless announcements at re:Invent, the community is still scrambling to make sense of them all. This post is all about AWS Fargate.
In this article, I will show you how to create an end-to-end serverless application that extracts thumbnails from video files. But, oh no, processing video files is a long-running process! Whatever will we do?
This is where Fargate comes in.
TL;DR A Docker container does the processing -> The container extracts the thumbnail and uploads the image to an S3 bucket -> The container is managed by AWS Fargate. All functionality is triggered from AWS Lambda functions and contained within a serverless application written with the Serverless Framework.
Excited? Me too! Read on. 💥

Some background & overview
With the execution time limits of the AWS Lambda platform, there are a lot of use cases involving long-running processes that are hard to implement.
On the flip side, serverless computing offers benefits (like zero-administration, pay-per-execution, and auto-scaling capabilities) that are hard to ignore. AWS recently announced AWS Fargate to bridge that gap.
AWS Fargate is a technology that allows you to use containers as a fundamental compute primitive without having to manage the underlying compute instances.
Fargate technology works on Amazon ECS & Amazon EKS, and allows users to run containers without having to manage servers or clusters.
Amazon ECS and Amazon EKS have two modes or launch types: Fargate and EC2.
With Fargate, all you have to do is package your application in containers, specify the CPU and memory requirements, define networking and IAM policies, and launch the application. You can define an ECS Task and call it from your Lambda function.
In this article, we will look at a serverless application built using Fargate and Lambda.
Most importantly: I have built the application so it's generic enough to be used as a reference template for any long-running processes that need to be executed as part of a serverless application. 😎
Let's dig in!
What we'll cover:
- Building a container image to extract thumbnails
- Setting up ECS using Fargate
- Defining an ECS Fargate Task
- Setting up IAM roles & policies
- Running the task
- Creating a serverless application
- Configuration and settings
- Triggering a Lambda function to run the ECS Fargate Task
- Triggering a Lambda function when thumbnail is generated
Workflow
The diagram below and the steps that follow describe the overall workflow of the the application we're building.

- Upload video to S3
- S3 triggers a Lambda function when the video is uploaded
- The Lambda function runs the ECS Fargate Task with appropriate parameters.
- The ECS Fargate Task executes the Docker container:
- that processes the video file to extract thumbnail,
- and uploads the thumbnail image to S3
- S3 triggers another Lambda function when the thumbnail is uploaded
- The Lambda function writes the url of the thumbnail to the log.
Note: If you are not interested in learning how the container image was built or how to test extracting the thumbnail locally, please skip ahead to the Setting up ECS (Fargate) section. I have the Docker container rupakg/docker-ffmpeg-thumb shared on Dockerhub for you to use.
Building the Container Image
We're encapsulating the core functionality—extracting a thumbnail from a video file—in a container.
We'll be using ffmpeg to manipulate the video, and the AWS CLI to upload the thumbnail to S3. The container image accepts parameters to customize the functionality.
Let's look at the Dockerfile and then see how we would execute it.
Dockerfile
Here is the Dockerfile:
FROM jrottenberg/ffmpeg
LABEL maintainer="Rupak Ganguly <rupakg@gmail.com>"

RUN apt-get update && \
    apt-get install python-dev python-pip -y && \
    apt-get clean

RUN pip install awscli

WORKDIR /tmp/workdir

COPY copy_thumbs.sh /tmp/workdir

ENTRYPOINT ffmpeg -i ${INPUT_VIDEO_FILE_URL} -ss ${POSITION_TIME_DURATION} -vframes 1 -vcodec png -an -y ${OUTPUT_THUMBS_FILE_NAME} && ./copy_thumbs.sh
I use the base image jrottenberg/ffmpeg for ffmpeg and then install the AWS CLI. Then I execute ffmpeg, passing it the parameters and then executing the copy_thumbs.sh script.
The copy_thumbs.sh script uploads the extracted thumbnail to S3. The ENTRYPOINT describes the command I used to extract a frame from the video file.
Note: ffmpeg has many options to optimize what we're doing and is out of this article's scope. Check out ffmpeg docs for details.
Now that we have looked at the Dockerfile, let's download the latest code from the repo to our machine and build the image:
$ git clone https://github.com/rupakg/docker-ffmpeg-thumb.git

$ docker build -t docker-ffmpeg-thumb .
Note: Check out the docker-ffmpeg-thumb Github repo for the latest code.
For your convenience, I have the Docker container rupakg/docker-ffmpeg-thumb shared on Dockerhub for you to use.
Running the Container Locally
Let's run the container image we created by passing it the required parameters:
docker run \
    -e INPUT_VIDEO_FILE_URL='https://s3url/mybucket/file.mp4' \
    -e POSITION_TIME_DURATION='00:08' \
    -e OUTPUT_THUMBS_FILE_NAME='test.png' \
    -e OUTPUT_S3_PATH='mybucket/myfolder' \
    -e AWS_REGION='us-east-1' \
    rupakg/docker-ffmpeg-thumb
The parameters are pretty intuitive. Additionally, pass in the AWS credentials in the above command, and you should have a thumbnail in the specified S3 mybucket/myfolder path.
With the functionality working using the container image, let's look at using it in a ECS (Fargate) task and build it into a serverless application.
Setting up ECS using Fargate
If you have already worked with ECS, you might have some or all of these steps completed. But I'm going to walk you through the steps of setting up ECS with Fargate, assuming that you have not done it before.
AWS provides a First Run Wizard that is an excellent resource to start playing with ECS using Fargate. The wizard does a few things for us, as shown below:
 Figure 1: AWS ECS Fargate First Run Wizard
Container Definition
First, we will create the container definition.
Note that AWS provides us a couple of pre-defined container definitions (as shown below), but we will select the 'custom' option and create a new container definition from scratch.
 Figure 2: Container definition
Click the 'Configure' button. In the resulting pop-up screen, fill in the 'Container Name' and the 'Image':
 Figure 3: Configure container
Note: The image for the container specified by rupakg/docker-ffmpeg-thumb:latest is the image that we built earlier. In this case, note that I am using the Docker Hub registry url pointing to the Docker image I built and uploaded. If you created your own image, specify that Docker image url here. You are welcome to use my Docker image as well.
Next, open up the section 'Advanced container configuration', and in the 'ENVIRONMENT' section, add the following 'Env Variables':
AWS_REGION - us-east-1
INPUT_VIDEO_FILE_URL - https://s3.amazonaws.com/your-s3-bucket-name/test.mp4
OUTPUT_S3_PATH - your-s3-bucket-name/your-thumbnail-folder-name
OUTPUT_THUMBS_FILE_NAME	 - test.png
POSITION_TIME_DURATION - 00:01
 Figure 4: Advanced container configuration: Environment
Leave the 'NETWORK SETTINGS' section empty.
Next, in the 'STORAGE AND LOGGING' add the following 'Log configuration' key/value pairs:
awslogs-group - /ecs/ffmpeg-thumb-task-definition
awslogs-region - us-east-1
awslogs-stream-prefix - ecs
 Figure 5: Advanced container configuration: Storage and Logging
Leave the 'RESOURCE LIMITS' and the 'DOCKER LABELS' sections empty.
Click the 'Update' button.
Task Definition
Next, we will edit the 'Task Definition', by clicking on the 'Edit' button:
 Figure 6: Task definition
Update the 'Task definition name' to ffmpeg-thumb-task-definition, and then click the 'Save' button:
 Figure 7: Update Task definition
The updates we made above to the Container and Task definition sections are shown below:
 Figure 8: Updated Container and Task definition
Service Definition
For our application we really don't need a 'service', but during the service definition creation step, AWS automatically creates a 'security group'. This is useful. So accept all the default values and click the 'Next' button:
 Figure 9: Create Service
Configuring the Cluster
This brings us to the last step: 'Cluster Configuration'.
Accept the default values of 'Cluster name' as default, and note that AWS will automatically create a VPC and subnets as needed. Click the 'Next' button:
 Figure 10: Cluster Configuration
Review
Let's review what we just configured. You can see all the settings in the screenshot below:
 Figure 11: Review
Click the 'Create' button to create the container definition, task definition, service and the cluster.
That should display a screen with all the items showing as 'complete'. You can then click on the 'View Service' button to view the service that was created:
 Figure 12: Setup Complete
Now, if you go back to the 'Task Definitions' menu item, you will see the new task that we just created. You can click on the task, and review the settings that we added. You can also create a new revision if you choose to at a later date:
 Figure 13: New Task
You can take a look at the JSON version of the task definition as shown below:
 Figure 14: Task JSON
Pre-requisite Resources
To be able to run our task and support the application, we need to create a couple of resources before-hand.
-
We need a S3 bucket where we will be uploading our videos for processing. The bucket in the setting
"bucket": "<your-s3-bucket-name>"will be created automatically when we deploy our app. -
We need to set an IAM Bucket Policy for the bucket to give it
publicpermission to get objects. Use the following policy and add it to the 'Bucket Policy' for the bucket, via the AWS S3 console:{ "Version": "2008-10-17", "Statement": [ { "Effect": "Allow", "Principal": "*", "Action": "s3:GetObject", "Resource": "arn:aws:s3:::<your-s3-bucket-name>/*" } ] } -
Under that bucket, we need a folder where the thumbnails extracted from the video file will be uploaded. We will need to manually create a folder with the name we have in the setting
"thumbnails_folder": "<your-thumbnail-folder-name>". -
Test the above changes by uploading a file to this bucket and then accessing it by its public url from a browser. If you can view the file, you are all set.
IAM Roles & Policies
For our task to access the S3 bucket/folder we specified from our account, we need to give it specific permissions. Since the container is executing inside the ECS context, we can add another role that will have the specific S3 access policies.
When we created our task definition, AWS created a role ecsTaskExecutionRole for us which gave access to run the task. Instead of updating that role directly, we will attach a new role for S3 access.
Let's create a new role. Go to the AWS IAM Console and switch to the 'Roles' tab:
 Figure 15: ECS Task Execution Role
Click on the ecsTaskExecutionRole role. On the resulting page, click on the 'Add inline policy' link:
 Figure 16: Add inline policy
On the 'Create Policy' screen, click on the JSON tab. I have already created JSON fragment that encapsulates the policy we need. Paste the following JSON in the text area:
{
    "Statement": [
        {
            "Action": [
                "s3:ListBucket",
                "s3:GetBucketLocation"
            ],
            "Effect": "Allow",
            "Resource": "arn:aws:s3:::<your-s3-bucket-name>"
        },
        {
            "Action": [
                "s3:PutObject"
            ],
            "Effect": "Allow",
            "Resource": "arn:aws:s3:::<your-s3-bucket-name>/<your-thumbnail-folder-name>/*"
        }
    ],
    "Version": "2012-10-17"
}
Basically, the above policy allows our task to list our bucket and also allows to put an object into the bucket/folder path.
Click the 'Review policy' button, and give the new role a name UploadToS3RolePolicy. Click the 'Create policy' button to create the policy and attach it to the ecsTaskExecutionRole role.
You can see the resulting screen below:
 Figure 17: Attach new role
With all the pre-requisite setup completed, we can now initiate running the task we created!
Initiating the Task Execution
Now that we have a task set up, let's run it.
We will start by running the task from the AWS Console. Check the box next to the task, click on the 'Actions' dropdown menu, and select the 'Run Task' item:
 Figure 18: Initiate Run Task
In the following screen, we need to specify some settings that are required by the task to run:
 Figure 19: Task Run settings
Here are a couple of things that are going on:
- Pick 'FARGATE' as 'Launch type'
- Pick 'default' as 'Cluster'
- Assign '1' for 'Number of tasks'
- For 'Cluster VPC', pick one with the non-internal IP i.e. 172.x.x.x
- Only then you will see the 'Subnets' dropdown populate. Pick any two
- Pick the default 'Security group' that AWS created
- Pick 'ENABLED' for 'Auto-assign public IP'
Leave the 'Task Overrides' section under 'Advanced Options' as-is.
Note that a 'Task Execution Role' currentecsTaskExecutionRole has been automatically created and assigned to the task. This IAM role gives permission to run/start the task.
The 'Container Overrides' section gives us an opportunity to override any settings for the container we created. It should be populated with the settings that we added while creating the task definition.
If you choose to change any of these settings, you can do so now in this section:
 Figure 20: Container Overrides
Once you are satisfied with your changes, click the 'Run Task' button.
Running the Task
After the task is run, you can see an instance of the task being created on the resulting page:
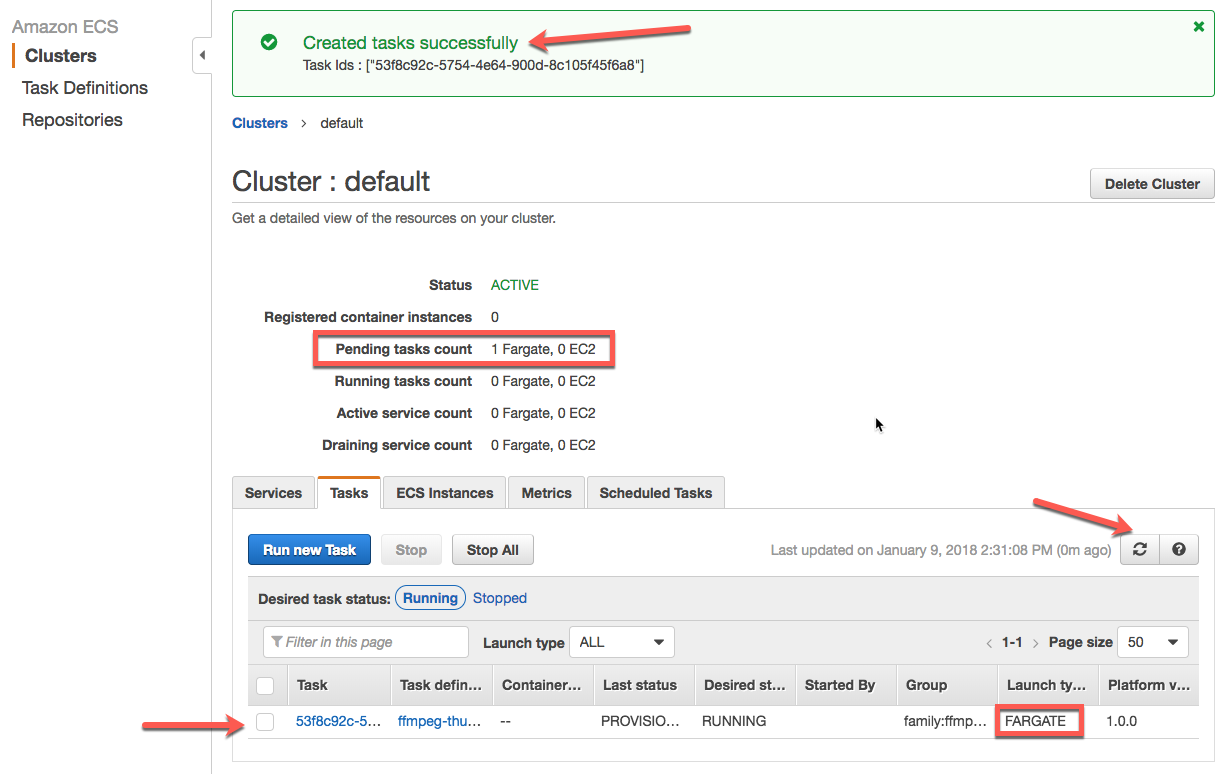 Figure 21: Task Created
Let's click on the task under the column 'Task'. We can see the details of the task in the following screen:
 Figure 22: Running Task Details
Once the 'Last status' field changes to 'STOPPED', you can switch to the 'Logs' tab to see the logs of the execution output:
 Figure 23: Log output
As you can see in the output, the container we created generated a thumbnail from the video file it was passed, and uploaded it to the S3 bucket/folder we specified.
Side note: you can also use the AWS CLI to run/start/stop the task.
aws --region us-east-1 ecs run-task --task-definition ffmpeg-thumb-task-definition
Now that we have executed the task from the AWS comsole, let's create a serverless app that will run the task based on parameters we pass along.
This is where things get cool.
Creating the App
To recap, we are trying to extract a thumbnail from a video file based on a frame position that we specify.
Here is the workflow:
- Upload video to S3
- S3 triggers a Lambda function when the video is uploaded
- Get the S3 object related metadata from the event
- The Lambda function runs the ECS Fargate Task with appropriate parameters
- The ECS Fargate Task executes the Docker container:
- that processes the video file to extract thumbnail,
- and uploads the thumbnail image to S3
- S3 triggers another Lambda function when the thumbnail is uploaded
- The Lambda function writes the url of the thumbnail to the log
Let's start by creating a new serverless app using the Serverless Framework's boilerplate template aws-nodejs. We will name the app ffmpeg-video-thumb.
To follow along, please download or clone the code for the app ffmpeg-video-thumb, and open it in an editor.
Configuration
The source code for the application is pretty generic, but you will need to supply it configuration settings that apply to your needs. Some of these configuration items include custom settings, plugins, IAM roles, and event rules for functions.
Custom Settings
We need the following settings that are defined in the custom section of the serverless.yml file. To make it easy, I have included a config.dev.example.json file with those entries.
# config.dev.example.json
{
  "region": "us-east-1",
  "bucket": "<your-s3-bucket-name>",
  "thumbnails_folder": "<your-thumbnail-folder-name>",
  "ecsTaskName": "<your-ecs-task-definition-name>",
  "ecsTaskVpcSubnet1": "<your-ecs-task-subnet>",
  "ecsTaskVpcSubnet2": "<your-ecs-task-subnet>",
  "clusterName": "<your-ecs-cluster-name>"
}
Copy the config.dev.example.json to config.dev.json, and then supply the values for the entries. The serverless.yml loads the settings from the config.dev.json at the time of deployment.
Note: The config.dev.json has been added to .gitignore file, so it will not be added to your git repo.
Plugins
There are cases, like one below, where you need the AWS CloudFormation Pseudo parameters in your configuration serverless.yml file.
execRoleArn: { "Fn::Join" : ["", [ "arn:aws:iam::", { "Ref" : "AWS::AccountId" }, ":role/ecsTaskExecutionRole" ] ] }
Luckily, there is a Serverless plugin for that!
Check out the awesome serverless-pseudo-parameters plugin written by Sander van de Graaf.
You can now use #{AWS::AccountId}, #{AWS::Region}, etc. in any of your config strings, and this plugin replaces those values with the proper pseudo parameter Fn::Sub CloudFormation function.
To install and add to the package.json, simply run:
npm i serverless-pseudo-parameters --save-dev
and in the serverless.yml file include it under the plugins block:
plugins:
  - serverless-pseudo-parameters
IAM Roles
To allow the Lambda functions in our serverless app to do certain actions, we need to set permissions with AWS.
We need the following permissions:
  iamRoleStatements:
    - Effect: "Allow"
      Action:
        - ecs:RunTask
      Resource: "*"
    - Effect: Allow
      Action:
        - iam:PassRole
      Resource: ${self:custom.execRoleArn}
    - Effect: "Allow"
      Action:
        - s3:GetObject
      Resource: "arn:aws:s3:::${self:custom.bucket}/*"
The above IAM Role settings in the serverless.yml file allows the Lambda functions to run ECS Tasks, assumes the role defined in the execRoleArn setting and allows getting S3 objects from the bucket we defined.
Event Rules for Functions
We have two Lambda functions. Each of them are configured with certain rules that trigger them.
  triggerOnUploadVideo:
    handler: handler.triggerOnUploadVideo
    events:
      - s3:
          bucket: ${self:custom.bucket}
          event: s3:ObjectCreated:*
          rules:
            - suffix: .mp4
The above configuration sets a rule for function triggerOnUploadVideo to be triggered based on an event from S3 when a object with suffix '.mp4' is created in the bucket we specified.
  triggerOnThumbnailCreation:
    handler: handler.triggerOnThumbnailCreation
    events:
      - s3:
          bucket: ${self:custom.bucket}
          event: s3:ObjectCreated:*
          rules:
            - prefix: ${self:custom.thumbnails_folder}/
            - suffix: .png
This configuration sets a rule for function triggerOnThumbnailCreation to be triggered based on an event from S3 when a object with suffix '.png' is created in the thumbnails_folder we specified.
Application Code
We looked at pre-requisites and then some configuration needed by our serverless application.
Now let's look at the function code that implements the features we need.
Lambda Function to Process Video
The Lambda function triggerOnUploadVideo is responsible for processing the video. It runs an ECS Task using Fargate, passing along appropriate parameters.
This function is triggered when a video file with the .mp4 extension is uploaded to the specified S3 bucket.
Let's take a quick look at the code at handler.js:
module.exports.triggerOnUploadVideo = (event, context, callback) => {

  const bucket = event.Records[0].s3.bucket.name;
  const key = event.Records[0].s3.object.key;
  ...
  const s3_video_url = `https://s3.amazonaws.com/${bucket}/${key}`;
  const thumbnail_file = key.substring(0, key.indexOf('_')) + '.png';
  const frame_pos = key.substring(key.indexOf('_')+1, key.indexOf('.')).replace('-',':');
  ...
  runThumbnailGenerateTask(s3_video_url, thumbnail_file, frame_pos);
  ...
};
When the function is triggered by an S3 event, metadata about the bucket and the key for the object is received. I use that data to populate the parameters that the runThumbnailGenerateTask function needs.
Note: I do a small hack to name the video file so that the position for the frame we want to extract as a thumbnail is part of the filename. So a file named test_00-10.mp4 will assume the frame position to be 00:10.
The code for the function runThumbnailGenerateTask is below:
var runThumbnailGenerateTask = (s3_video_url, thumbnail_file, frame_pos) => {

  // run an ECS Fargate task
  const params = {
    cluster: `${ECS_CLUSTER_NAME}`,
    launchType: 'FARGATE',
    taskDefinition: `${ECS_TASK_DEFINITION}`,
    ...
    overrides: {
      containerOverrides: [
        {
          name: 'ffmpeg-thumb',
          environment: [
            {
              name: 'INPUT_VIDEO_FILE_URL',
              value: `${s3_video_url}`
            },
    ...
  ecsApi.runECSTask(params);
}
Most of the function code is creating the params json structure that is passed to the helper function ecsApi.runECSTask to execute the ECS task using Fargate on AWS.
You can customize any of these parameters via configuration. The containerOverrides array has custom values for the environment vars we setup for our container image.
Lambda Function to Notify Thumbnail Creation
The Lambda function triggerOnThumbnailCreation is triggered when a '.png' file is uploaded to S3. It prints out the name of the thumbnail file into the logs.
Deploying the App
Now that we looked at the code, let's deploy and run the application!
$ sls deploy

Serverless: Packaging service...
Serverless: Excluding development dependencies...
AWS Pseudo Parameters
...
Serverless: Stack update finished...
...
endpoints:
  None
functions:
  triggerOnUploadVideo: rg-video-to-thumbnail-dev-triggerOnUploadVideo
  triggerOnThumbnailCreation: rg-video-to-thumbnail-dev-triggerOnThumbnailCreation
The app is deployed. Let's use it.
Upload an .mp4 video file in the AWS S3 bucket you configured. It has to be named something like test_00-10.mp4, where the 00-10 is the frame position of your thumbnail.
Running the App
Open up two terminal windows and let's tail the logs of our two functions.
Here is what we see for the triggerOnUploadVideo function. I will break the output up into sections and explain.
$ sls logs -f triggerOnUploadVideo -t

START RequestId: b602b28e-xxxx Version: $LATEST

2017-12-30 03:37:47.318 (-05:00)	b602b28e-xxxx
{
  "Records": [{
    "eventVersion": "2.0",
    "eventSource": "aws:s3",
    "awsRegion": "us-east-1",
    "eventTime": "2017-12-30T08:37:46.526Z",
    "eventName": "ObjectCreated:CompleteMultipartUpload",
    ...
    "s3": {
      ...
      "bucket": {
        "name": "my-bucket",
        ...
        "arn": "arn:aws:s3:::my-bucket"
      },
      "object": {
        "key": "bunny_00-03.mp4",
        "size": 26162774,
        ...
      }
    }
  }]
}

2017-12-30 03:37:47.318 (-05:00)	b602b28e-xxxx	A new file 'test_00-08.mp4' was uploaded to 'my-bucket' for processing.
2017-12-30 03:37:47.319 (-05:00)	b602b28e-xxxx	Processing file 'https://s3.amazonaws.com/my-bucket/bunny_00-03.mp4' to extract frame from position '00:08' to generate thumbnail 'test.png'.
Above, you can see that the function was triggered. Then the event JSON was written out, and the two log messages with the metadata for processing the video file.
2017-12-30 03:37:48.590 (-05:00)	b602b28e-xxxx	ECS Task ffmpeg-thumb-task-definition started:
[{
  "taskArn": "arn:aws:ecs:us-east-1:XXXXXXXXXXXXXXXX:task/914cda86-XXXXXXXXXXXXXXXX",
  "clusterArn": "arn:aws:ecs:us-east-1:XXXXXXXXXXXXXXXX:cluster/my-cluster",
  "taskDefinitionArn": "arn:aws:ecs:us-east-1:XXXXXXXXXXXXXXXX:task-definition/ffmpeg-thumb-task-definition:10",
  "overrides": {
    "containerOverrides": [{
      "name": "ffmpeg-thumb",
      "environment": [{
        "name": "INPUT_VIDEO_FILE_URL",
        "value": "https://s3.amazonaws.com/my-bucket/bunny_00-03.mp4"
      }, {
        "name": "OUTPUT_THUMBS_FILE_NAME",
        "value": "bunny.png"
      }, {
        "name": "POSITION_TIME_DURATION",
        "value": "00:03"
      }, {
        "name": "OUTPUT_S3_PATH",
        "value": "my-bucket/my-folder"
      }, {
        "name": "AWS_REGION",
        "value": "us-east-1"
      }]
    }]
  },
  "lastStatus": "PROVISIONING",
  "desiredStatus": "RUNNING",
  "cpu": "256",
  "memory": "512",
  "containers": [{
    "containerArn": "arn:aws:ecs:us-east-1:XXXXXXXXXXXXXXXX:container/533d0f19-69f7-XXXXXXXXXXXXXXXXX",
    "taskArn": "arn:aws:ecs:us-east-1:XXXXXXXXXXXXXXXX:task/914cda86-XXXXXXXXXXXXXXXX",
    "name": "ffmpeg-thumb",
    "lastStatus": "PENDING",
    "networkInterfaces": []
  }],
  "version": 1,
  "createdAt": "2017-12-30T08:37:48.573Z",
  "group": "family:ffmpeg-thumb-task-definition",
  "launchType": "FARGATE",
  "platformVersion": "1.0.0",
  "attachments": [{
    "id": "XXXXXXXXXXXXXXXXXX",
    "type": "ElasticNetworkInterface",
    "status": "PRECREATED",
    "details": [{
      "name": "subnetId",
      "value": "subnet-XXXXXXXX"
    }]
  }]
}]

END RequestId: b602b28e-ed3c-11e7-aeb6-b7f8f0abc2f3
REPORT RequestId: b602b28e-ed3c-11e7-aeb6-b7f8f0abc2f3

	Duration: 1277.13 ms	Billed Duration: 1300 ms 	Memory Size: 1024 MB	Max Memory Used: 35 MB
Here we see that soon after the ECS task is called by the function, the ECS task is run. You can see the data structure for the task that is passed.
Since the ECS task goes off in an async fashion, as far as the Lambda function is concerned—it has ended.
Let's tail the logs for the triggerOnThumbnailCreation function and wait for the thumbnail to be generated. In a few moments, the thumbnail is generated and the logs shows the message:
$ sls logs -f triggerOnThumbnailCreation -t

START RequestId: da7f7017-xxxx Version: $LATEST

2018-01-04 03:25:43.039 (-05:00)	da7f7017-xxxx
{
  "Records": [{
    ...
    "s3": {
      ...
      "bucket": {
        "name": "my-bucket",
        ...
        "arn": "arn:aws:s3:::my-bucket"
      },
      "object": {
        "key": "my-folder/bunny.png",
        "size": 1830681,
        ...
      }
    }
  }]
}

2018-01-04 03:25:43.040 (-05:00)	da7f7017-xxxx	A new thumbnail file was generated at 'https://s3.amazonaws.com/my-bucket/my-folder/bunny.png'.

END RequestId: da7f7017-xxxx
REPORT RequestId: da7f7017-xxxx

	Duration: 3.08 ms	Billed Duration: 100 ms 	Memory Size: 1024 MB	Max Memory Used: 33 MB
At this point, you can point your browser at the url printed in your logs and view the thumbnail.
Cost
I was curious what kind of cost I incurred while I was writing the article. I tested, created many tasks, and executed them many times over a reasonably long time scale.
Since it only charged me when the ECS tasks and Lambda functions were executed, the cost incurred is negligible.
Again, reminding us why serverless is the way to go... ⚡️

Extending the App
We used a simple hack to pass the frame position for the input video file, but in real life we might need more detailed data for processing our file.
In that case, a solution that uses AWS Kinesis to store metadata for the video, while S3 is used only for storage purposes, could be a viable option.
Summary
We looked at a possible solution to execute long-running processes in ECS using Fargate, but with tight integration with AWS Lambda. We built a Docker container to encapsulate the long-running process.
We set up ECS using Fargate and created an ECS task to execute our container. We tested the functionality of extracting a thumbnail from a video file. Even better, we built and deployed a serverless application from scratch, written with the Serverless Framework.
I know the article is a long one (to be honest it threw me for a loop just to write it!), but I wanted to capture what it takes to build such an application end-to-end.
I'd love to hear from you about other use cases you solved with the reference app we built, or any you have in mind.
Any questions or feedback, please leave it below!