Update: This post is based on the beta version of Serverless Components, which is not compatible with the latest, and much faster, GA version. Please check out the latest docs for more up to date information.
In previous posts, we’ve explored how to create a static website and a REST API with Serverless Components. This post is going to build on top of that knowledge to create a dynamic website powered by a database.
The example dynamic website we’re going to put together is a retail app. Just a simple eCommerce website that lists the products in your database via a REST API.
Getting started
First, a quick overview of the Components we are using, and how you'll need to set up your environment.
Components we’re going to use
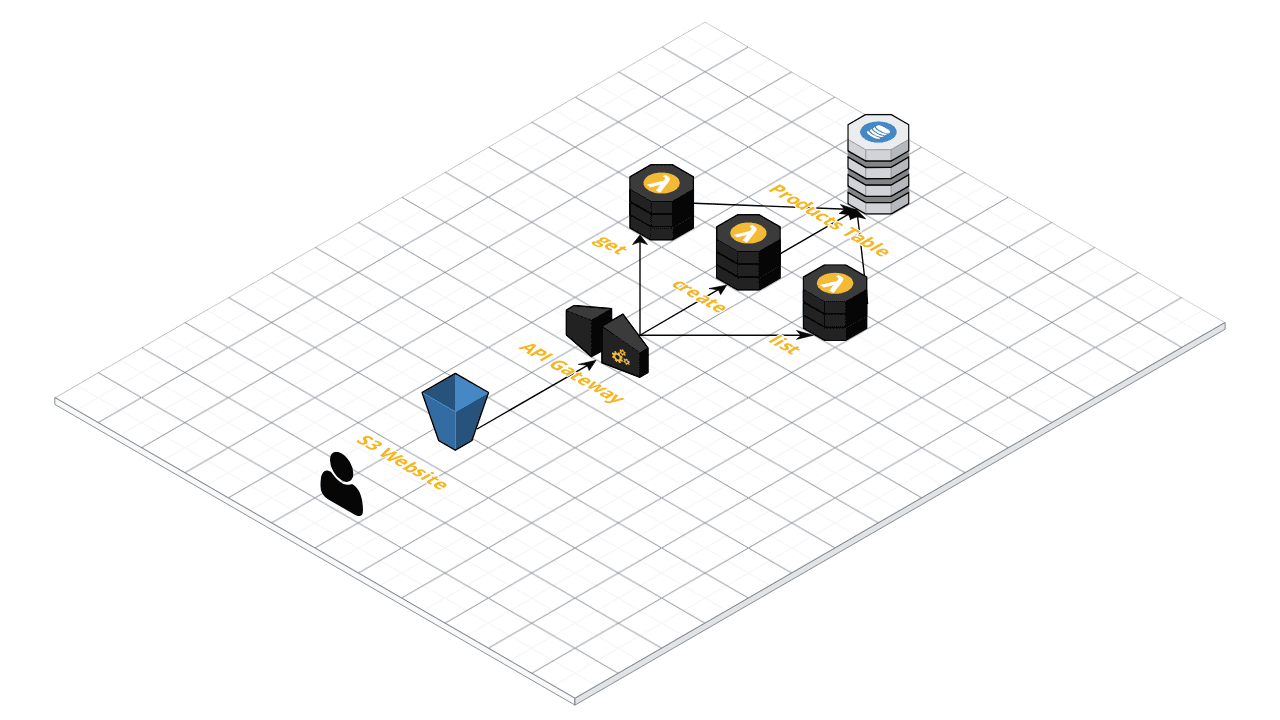
To assemble our dynamic site, we’re gonna use the following lower-level components:
- static-website: For the frontend logic of our application
- aws-lambda: For the backend logic of our application
- aws-apigateway: For the REST API endpoints
- aws-dynamodb: For our products database
You can find all those components in our registry. Overall, our entire app architecture looks like this:
Ready to start? Let's go.
Install Serverless Components
If you haven’t already, install Serverless Components with the following command:
npm i serverless-components -g
You’ll also need to have an AWS account to host pretty much everything.
Alright! Now that we have everything set up, lets starting building our retail app!
Setting up the frontend
We’ll start out by setting up the frontend via S3. All you have to do is create a serverless.yml file, use the static-website component, and pass in the required config.
Add the following config to a serverless.yml file:
type: retail-app
version: 0.0.1

components:
  webFrontend:
    type: static-website
    inputs:
      name: retail-frontend
      contentPath: ${self.path}/frontend
      templateValues:
        apiUrl: ${productsApi.url}
      contentIndex: index.html
      contentError: error.html
      hostingRegion: us-east-1
      hostingDomain: retail-${self.serviceId}.example.com
      aliasDomain: www.retail-${self.serviceId}.example.com
Couple of things to notice here. We're referencing the self object, which includes some useful information about your new component, like the path, and the serviceId. The path is the absolute path of your component, and serviceId is an auto-generated id for your component/service, which you can utilize to make sure your child components have unique ids that are associated with each other.
Using this path property, we're referencing our frontend code on our file system, which lives in a frontend directory. There are a lot of files in there, so to keep this post clean, you can check this directory in our examples directory and add it to your filesystem. It should be pretty straightforward.
You'll also notice that we're referring to a REST API component using the variable syntax ${productsApi.url}. So we'll need to add that component. Let's do that!
Setting up the REST API
You can add a REST API by adding the rest-api component. This component supports both AWS API Gateway and Serverless Event Gateway.
In this example, we're going to use the API Gateway. Let's add this component to our serverless.yml file by adding this config:
  productsApi:
    type: rest-api
    inputs:
      gateway: aws-apigateway
      routes:
        /products:
          post:
            function: ${createProduct}
            cors: true
          /{id}:
            get:
              function: ${getProduct}
              cors: true
        /catalog/{...categories}:
          get:
            function: ${listProducts}
            cors: true
Sweet! Now we have a REST API set in place. As you can see, this REST API needs 3 function backends to process your API requests. So we'll need to add 3 Lambda function components. We're going to do that next.
Setting up the backend code
Just add 3 aws-lambda components to your config along with the actual logic.
To do that, you can add the following config:
  createProduct:
    type: aws-lambda
    inputs:
      memory: 512
      timeout: 10
      handler: products.create
      root: ${self.path}/code
      env:
        productTableName: products-${self.serviceId}
  getProduct:
    type: aws-lambda
    inputs:
      memory: 512
      timeout: 10
      handler: products.get
      root: ${self.path}/code
      env:
        productTableName: products-${self.serviceId}
  listProducts:
    type: aws-lambda
    inputs:
      memory: 512
      timeout: 10
      handler: products.list
      root: ${self.path}/code
      env:
        productTableName: products-${self.serviceId}
You'll notice that we're referencing to our code base with the root: ${self.path}/code property. So we'll need to add that before moving forward.
Just create a code directory in the root directory of your component (where serverless.yml lives) and add an index.js file inside that looks like this:
const AWS = require('aws-sdk')

const dynamo = new AWS.DynamoDB.DocumentClient({ region: 'us-east-1' })

const tableName = process.env.productTableName

function create(evt, ctx, cb) {
  const item = JSON.parse(evt.body)
  dynamo.put(
    {
      Item: item,
      TableName: tableName
    },
    (err, resp) => {
      if (err) {
        cb(err)
      } else {
        cb(null, {
          statusCode: 201,
          headers: {
            'Content-Type': 'application/json',
            'Access-Control-Allow-Origin': '*'
          },
          body: JSON.stringify(resp)
        })
      }
    }
  )
}

function get(evt, ctx, cb) {
  const vId = parseInt(evt.pathParameters.id, 10)
  dynamo.get(
    {
      Key: {
        id: vId
      },
      TableName: tableName
    },
    (err, data) => {
      if (err) {
        cb(err)
      } else {
        const product = data.Item
        cb(null, {
          statusCode: 200,
          headers: {
            'Content-Type': 'application/json',
            'Access-Control-Allow-Origin': '*'
          },
          body: JSON.stringify(product)
        })
      }
    }
  )
}

function list(evt, ctx, cb) {
  dynamo.scan(
    {
      TableName: tableName
    },
    (err, data) => {
      if (err) {
        cb(err)
      } else {
        const products = data.Items
        cb(null, {
          statusCode: 200,
          headers: {
            'Content-Type': 'application/json',
            'Access-Control-Allow-Origin': '*'
          },
          body: JSON.stringify(products)
        })
      }
    }
  )
}

module.exports = { create, get, list }
We won't get into the details of the code above, but it should be pretty self explanatory. Essentially, you'll be exporting the 3 Lambda handlers needed by your REST API.
Wait a minute, our Lambda codebase is referring to a DynamoDB database table to query. So we'll need to add this final piece of the puzzle. Let's do it!
Setting up the database
We're going to use the aws-dynamodb component to provision this products database. To do that, just add the following config to your serverless.yml:
  productsDb:
    type: aws-dynamodb
    inputs:
      region: us-east-1
      tables:
        - name: products-${self.serviceId}
          hashKey: id
          indexes:
            - name: ProductIdIndex
              type: global
              hashKey: id
          schema:
            id: number
            name: string
            description: string
            price: number
          options:
            timestamps: true
Awesome! We just assembled the final piece of our new component. It's a lot like LEGO, isn't it?
If you deploy your component, your entire app should be deployed. However, for the sake of demonstration, let's add a final step to seed some product data in the database so that you can view it on the website.
BONUS: Seeding data
Remember that, at the end of the day, you're creating a brand new component using lower-level components. You can add logic specific to this new higher-order component just like you do with other components.
In our use case, we need some logic to seed data into our database. We can do that by adding an index.js file with the following logic:
const { readFile } = require('fs')

module.exports = {
  async deploy(inputs, context) {
    const productsDb = await context.children.productsDb
    const products = await new Promise((resolve, reject) =>
      readFile('data/products.json', (err, data) => {
        if (err) {
          reject(err)
        } else {
          resolve(JSON.parse(data))
        }
      })
    )

    if (products.length > 0) {
      const tablename = `products-${context.serviceId}`
      context.log(`Seeding ${products.length} items into table ${tablename}.`)

      const insertItem = (triesLeft, wait) => (product) =>
        productsDb.fns
          .insert(productsDb.inputs, {
            log: context.log,
            state: productsDb.state,
            options: {
              tablename,
              itemdata: product
            }
          })
          .catch(async (error) => {
            if (triesLeft > 0) {
              return new Promise((resolve, reject) => {
                setTimeout(() => {
                  const doInsert = insertItem(triesLeft - 1, wait)(product)
                  doInsert.then(resolve, reject)
                }, wait)
              })
            }

            throw error
          })

      const insertions = products.map(JSON.stringify).map(insertItem(30, 8000))
      await Promise.all(insertions)
    }
  }
}
Did you notice our reference to the serviceId? Just like with the config above, you can access the serviceId along with other useful information under the passed in context object. It's a lot like the self object above, but on steroids!
We're also loading a products.json file from a data directory. So let's create a data directory in our component root and add this products.json file in there. It should look something like this:
[
  {
    "id": 20,
    "name": "Model A",
    "description": "Our standard, highly reliable part.",
    "price": "6.99"
  },
  {
    "id": 21,
    "name": "Model B",
    "description": "A cost-reduced version of our classic offering, providing the highest value.",
    "price": "4.99"
  },
  {
    "id": 22,
    "name": "Model A+",
    "description": "A precision-milled, highly durable enhancement of the Model A for performance applications.",
    "price": "8.99"
  }
]
Visit your new website
Alright! Now we're ready to deploy! Just run the following command:
components deploy
At this point, all your components are being provisioned, and your seed data will be inserted into the newly created database.
After deployment is complete, you should see the following output:
REST API resources:
  POST - https://ohp05ymthk.execute-api.us-east-1.amazonaws.com/dev/products
  GET - https://ohp05ymthk.execute-api.us-east-1.amazonaws.com/dev/products/{id}
  GET - https://ohp05ymthk.execute-api.us-east-1.amazonaws.com/dev/catalog/{...categories}
Static Website resources:
  http://retail-kqrpf6qiie.example.com.s3-website-us-east-1.amazonaws.com
Objects Found: 31 , Files Found: 31 , Files Deleted: 0
retail-app (master) ⚡️
Now you can see your REST API endpoints, along with the root url of your newly created dynamic website. Just copy this website and open it in your browser.
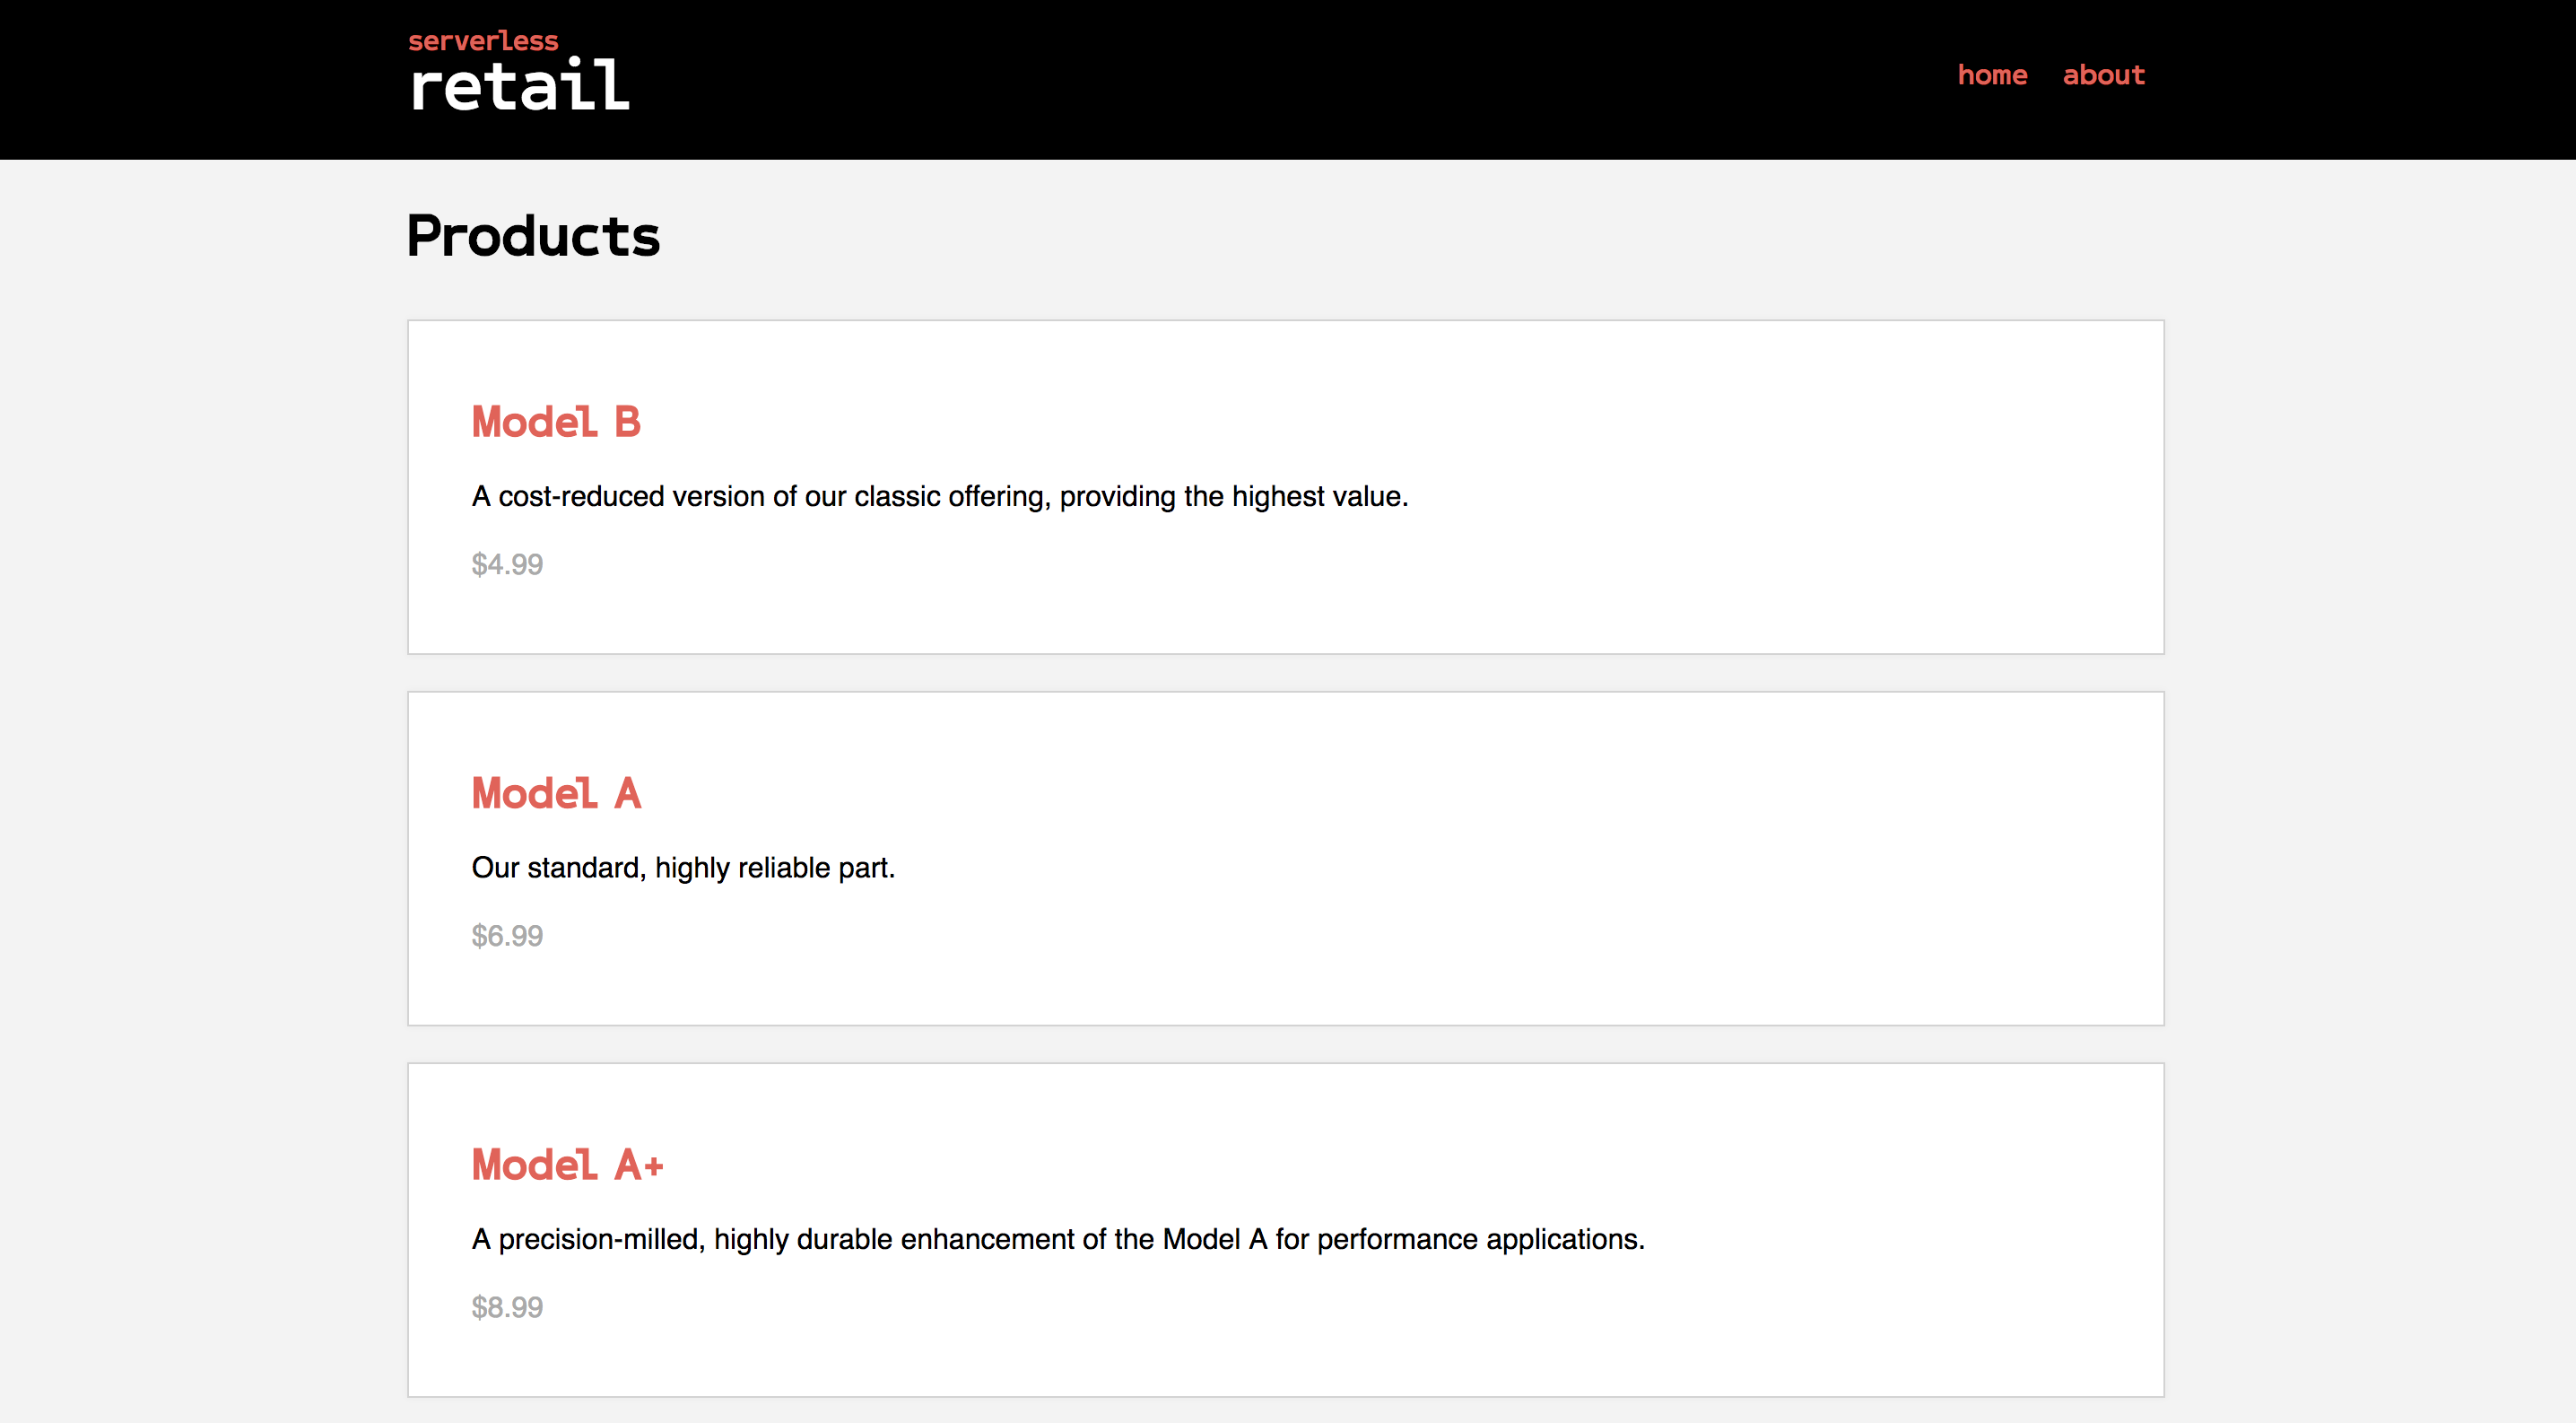
Voila! Your dynamic website is live!
Notice all the frontcode we’ve added, along with the seeded products from the database getting queried by the Lambda functions via our REST API.
Summary
In a nutshell, what we've done is added the following components, along with their required config & code:
static-website: Hosted on AWS S3 to hold our frontend codebaserest-api: Using AWS API Gateway to provision our 3 RESTful API endpointsaws-lambda: We added 3 of those as backend for our 3 API endpointsaws-dynamodb: Our products database, and seeded some fixture data into it
And this is how you can create a dynamic website with Serverless Components!
You can extend this app by adding even more frontend code and routes and do more queries to our backend. You can also add more backend logic and infrastructure, all with nothing but Serverless Components.
Hope you found this walkthrough useful. You can check the entire example app in our components directory.
Happy hacking!