
To see how DynamoDB compares to MongoDB, Cassandra, or BigTable, see here.
AWS gives devs some powerful building blocks for making amazing applications. In this walkthrough, we're going to create a multi-region, multi-master, geo-routed application—all in about 30 minutes.
We'll have compute located on two different continents writing to databases in their own region, and the written data will be replicated to the database in the other region. Users will be directed to the closest region according to their location.
Prefer the video walkthrough? The webinar was recorded live, and is available on Cloud Academy; give it a watch!
Now, on to the word-wise walkthrough.
Setting up your app
Before we begin, you'll need the Serverless Framework installed with an AWS account set up. Your version of Serverless must be 1.25 or higher to take advantage of regional endpoints.
I'm going to write this in Python because I love Python. But you can do it in any language you want.
Create a new Serverless project from a template using the sls create command and change into that directory:
$ sls create -t aws-python3 -p serverless-multi-region
$ cd serverless-multi-region
Basic functionality
Our application will be a web API over a key-value store, where users can submit and retrieve values for keys. The path in the URL will be the key name, and the payload for a POST request will be the value.
To handle the basic functionality with our application, we'll need three things:
- a DynamoDB table to store our keys and values,
- a
set_keyfunction to allow users to store the value for a key - a
get_keyfunction to allow users to retrieve the value for a key
Edit your serverless.yml so that it looks as follows:
# serverless.yml

service: serverless-keyvalue

frameworkVersion: ">=1.25.0"

custom:
  tableName: "keyvalues"

provider:
  name: aws
  runtime: python3.6
  stage: dev
  region: ${opt:region}
  endpointType: regional
  iamRoleStatements:
    - Effect: "Allow"
      Action:
        - dynamodb:GetItem
        - dynamodb:PutItem
      Resource:
        "Fn::GetAtt":
            - KeyValuesDynamoDBTable
            - Arn
  environment:
    KEY_TABLE:
      Ref: KeyValuesDynamoDBTable

functions:
  getKey:
    handler: handlers/get_key.main
    events:
      - http:
          path: /{key}
          method: get
          cors: true
  setKey:
    handler: handlers/set_key.main
    events:
      - http:
          path: /{key}
          method: post
          cors: true

resources:
  Resources:
    KeyValuesDynamoDBTable:
      Type: 'AWS::DynamoDB::Table'
      Properties:
        TableName: ${self:custom.tableName}
        AttributeDefinitions:
          -
            AttributeName: key
            AttributeType: S
        KeySchema:
          -
            AttributeName: key
            KeyType: HASH
        ProvisionedThroughput:
          ReadCapacityUnits: 1
          WriteCapacityUnits: 1
        StreamSpecification:
          StreamViewType: NEW_AND_OLD_IMAGES
Let's walk through this a bit.
In the resources section, we've used CloudFormation to define our DynamoDB table. We've see it has a HASH key named "key"—this is the primary access pattern for our table.
In the provider section, we've added iamRoleStatements that give our functions GetItem and PutItem permissions to our table. We've also injected the name of the table into our environment via the KEY_TABLE variable.
Also, note that we're using a regional endpoint with endpointType: regional. This was added in the 1.25 release of the Serverless Framework, and it allows us to have our endpoint in a particular region, rather than at all CloudFront edge locations.
Finally, in the functions section, we have our two functions: getKey and setKey. The function handlers are defined in the handlers directory in the get_key and set_key modules.
Let's add our handlers. First, remove the templated handler.py and add a handlers directory:
$ rm handler.py
$ mkdir handlers
Add the code for your setKey function in handlers/set_key.py:
# handlers/set_key.py

import json
import os

import boto3

KEY_TABLE_NAME = os.environ['KEY_TABLE']
CLIENT = boto3.client('dynamodb')
REGION = os.environ.get('AWS_REGION')


def main(event, context):
    body = json.loads(event.get('body'))
    key = event.get('pathParameters').get('key')
    value = body.get('value')

    if not value:
        response = {
            "statusCode": 400,
            "body": json.dumps({"error": "Missing a value for 'value' in JSON body."})
        }
        return response

    try:
        CLIENT.put_item(
            TableName=KEY_TABLE_NAME,
            Item={
                'key': {'S': key},
                'value': {'S': value},
                'region': {'S': REGION}
            }
        )
        response = {
            'statusCode': 200,
            'body': json.dumps({
                'key': key,
                'value': value,
                'region': REGION
            })
        }
    except Exception as e:
        print(e)
        response = {
            "statusCode": 400,
            "body": json.dumps({"error": "Sorry, an error occurred while writing your key."})
        }

    return response
We will parse the key name from the URL path parameter and the value from the JSON body in the POST request. Then we'll save a DynamoDB Item with the key, value, and region it was written from.
Then, we'll add the code for our getKey function in handlers/get_key.py:
# handlers/get_key.py

import json
import os

import boto3

KEY_TABLE_NAME = os.environ['KEY_TABLE']
CLIENT = boto3.client('dynamodb')
REGION = os.environ.get('AWS_REGION')


def main(event, context):
    key = event.get('pathParameters').get('key')

    try:
        resp = CLIENT.get_item(
            TableName=KEY_TABLE_NAME,
            Key={
                'key': {'S': key},
            }
        )
        item = resp.get('Item')
        response = {
            'statusCode': 200,
            'body': json.dumps({
                'key': item.get('key', {}).get('S'),
                'value': item.get('value', {}).get('S'),
                'writeRegion': item.get('region', {}).get('S'),
                'readRegion': REGION,
            })
        }
    except Exception as e:
        print(e)
        response = {
            "statusCode": 400,
            "body": json.dumps({"error": "Sorry, an error occurred while retrieving your key."})
        }

    return response
It takes the key from the path, retrieves it from DynamoDB, and returns it to the user. Note that it returns both the region it was last written from and the region that it's currently being read from. This will be useful later on.
Great, let's deploy it. I'm going to use the us-west-2 region:
$ sls deploy --region us-west-2
Serverless: Packaging service...
...<snip>...
Service Information
service: serverless-keyvalue
stage: dev
region: us-west-2
stack: serverless-keyvalue-dev
api keys:
  None
endpoints:
  GET - https://6rbm4350zj.execute-api.us-west-2.amazonaws.com/dev/{key}
  POST - https://6rbm4350zj.execute-api.us-west-2.amazonaws.com/dev/{key}
functions:
  getKey: serverless-keyvalue-dev-getKey
  setKey: serverless-keyvalue-dev-setKey
If your deploy was successful, it will show your base url in the endpoints block of your Service Information.
Let's test our endpoints. Export your url into a variable called BASE_URL, then run a curl command to set a key:
$ export BASE_URL="https://6rbm4350zj.execute-api.us-west-2.amazonaws.com/dev/"
$ curl -X POST ${BASE_URL}testkey -d '{"value": "Just testing"}'
{"key": "testkey", "value": "Just testing", "region": "us-west-2"}
And now, let's retrieve it:
$ curl -X GET ${BASE_URL}testkey
{
  "key": "testkey",
  "value": "Just testing",
  "writeRegion": "us-west-2",
  "readRegion": "us-west-2"
}
Awesome, we retrieved our key. Note that it says it was last written in the us-west-2 region and that we're currently reading from the us-west-2 region.
Adding a custom domain
Now, let's add a custom domain to our endpoint. This means: (a) we won't have a funky endpoint like 6rbm4350zj.execute-api.us-west-2.amazonaws.com; (b) it'll be easier to geo-route later.
To follow along here, you will need to own a domain registered in Route53.
We're going to use the serverless-domain-manager plugin to simplify this.
Note: If you want more details on this, read our post on setting up your custom domain with Serverless & API Gateway. This usage will be a little bit different since we're using a new feature to set up regional domains.
My base domain is serverlessteam.com. I want my app to generally be accessible at keyvalues.serverlessteam.com.
First, let's create an SSL certificate for our domain using Amazon Certificate Manager (ACM). Navigate to Amazon Certificate Manager in the region you want to deploy your endpoint. Click "Request a certificate" and enter your domain.
I'll create a certificate at keyvalue.serverlessteam.com.
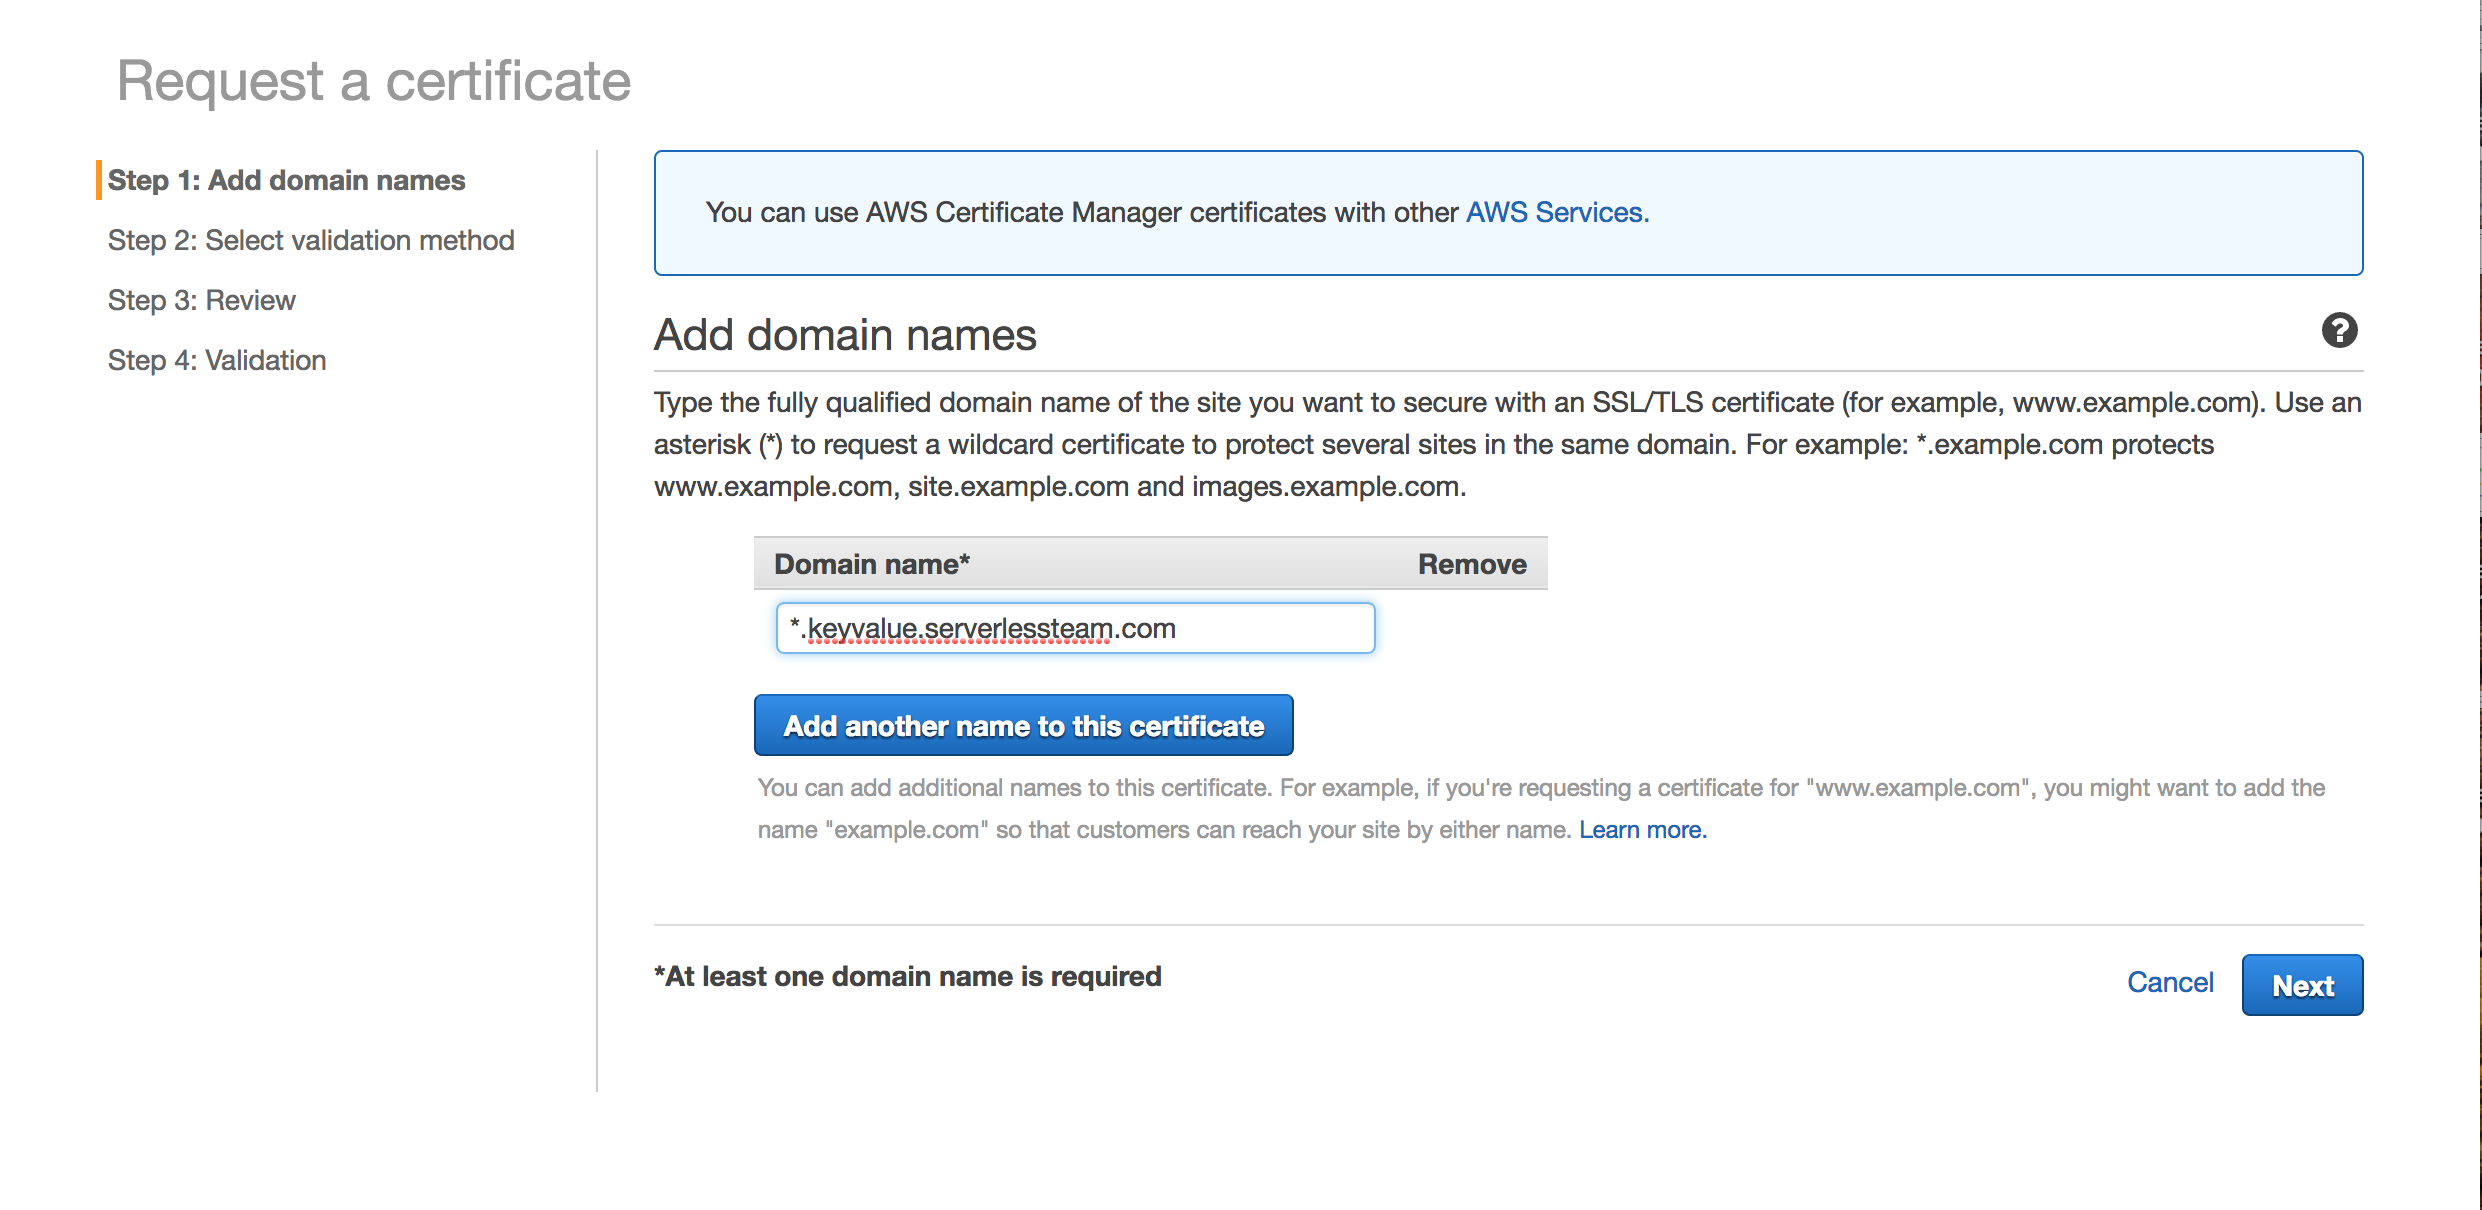
Hit 'Next', and AWS will send your domain manager an email to confirm the certificate.
While you're here, you should create one for your other region as well. I created mine in eu-central-1 (Frankfurt) using the same process.
Next, install the serverless-domain-manager plugin using npm:
$ npm init -f
$ npm install --save-dev serverless-domain-manager
Configure your serverless.yml by adding the plugin to plugins and adding config in the custom block:
# serverless.yml
service: serverless-keyvalue

frameworkVersion: ">=1.25.0"

plugins:
  - serverless-domain-manager

custom:
  tableName: "keyvalues"
  customDomain:
    domainName: keyvalue.serverlessteam.com
    endpointType: 'regional'
    certificateRegion: ${opt:region}
    createRoute53Record: false

provider:
....
This will help us provision a custom domain in API Gateway. Note that we're provisioning a regional endpointType, and the domain name will use the region. We won't have it create our Route53 record as we'll create that separately.
Go on and create your domain:
$ sls create_domain --region us-west-2
Serverless: Skipping creation of Route53 record.
Serverless: 'keyvalue.serverlessteam.com' was created/updated. New domains may take up to 40 minutes to be initialized.
Because it can take up to 40 minutes to provision a domain, let's provision our other region while we're here:
$ sls create_domain --region eu-central-1
Serverless: Skipping creation of Route53 record.
Serverless: 'keyvalue.serverlessteam.com' was created/updated. New domains may take up to 40 minutes to be initialized.
And now, deploy our two services:
$ sls deploy --region us-west-2
... Deploy output ....

$ sls deploy --region eu-central-1
... Deploy output ...
Both our services are deployed. Let's set up the Route53 Latency records to our endpoints.
Latency-based routing is a really interesting feature of Route53. It allows you to create multiple DNS records for the same resource. Each DNS record points to IP addresses in different regions. When the user makes a DNS query, Route53 will return the record that offers the lowest latency based on the requesting user's location. Neat.
We'll create two records for keyvalue.<yourdomain>.com—one in us-west-2 and one in eu-central-1. Use the script below, modifying the value of DOMAIN in the first line to match your domain:
$ DOMAIN=serverlessteam.com
SUBDOMAIN=keyvalue.${DOMAIN}
STACKNAME=serverless-keyvalue-dev
HOSTEDZONE=$(aws route53 list-hosted-zones --query 'HostedZones[?Name==`'${DOMAIN}'.`].Id' --output text)
USDOMAIN=$(aws cloudformation describe-stacks --stack-name ${STACKNAME} --region us-west-2 --query 'Stacks[0].Outputs[?OutputKey==`DomainName`].OutputValue' --output text)
EUROPEDOMAIN=$(aws cloudformation describe-stacks --stack-name ${STACKNAME} --region eu-central-1 --query 'Stacks[0].Outputs[?OutputKey==`DomainName`].OutputValue' --output text)

aws route53 change-resource-record-sets \
  --hosted-zone-id ${HOSTEDZONE} \
  --change-batch  '{
      "Comment": "optional comment about the changes in this change batch request",
      "Changes": [
        {
          "Action": "UPSERT",
          "ResourceRecordSet": {
            "Name": "'${SUBDOMAIN}'",
            "Type": "CNAME",
            "TTL": 300,
            "SetIdentifier": "us-west-2",
            "Region": "us-west-2",
            "ResourceRecords": [
              {
                "Value": "'${USDOMAIN}'"
              }
            ]
          }
        },
        {
          "Action": "UPSERT",
          "ResourceRecordSet": {
            "Name": "'${SUBDOMAIN}'",
            "Type": "CNAME",
            "TTL": 300,
            "SetIdentifier": "eu-central-1",
            "Region": "eu-central-1",
            "ResourceRecords": [
              {
                "Value": "'${EUROPEDOMAIN}'"
              }
            ]
          }
        }
      ]
    }'
After this operation, you'll have latency records pointing to your regional API Gateways using the same subdomain. Let's try it out.
Set a key in your US region:
$ curl -X POST ${USDOMAIN}/testing -d '{"value": "It worked"}'
{"key": "testing", "value": "It worked", "region": "us-west-2"}
Then retrieve it:
$ curl -X GET ${USDOMAIN}/testing
{
  "key": "testing",
  "value": "It worked",
  "writeRegion": "us-west-2",
  "readRegion": "us-west-2"
}
Let's try retrieving the key from our European region:
$ curl -X GET ${EUROPEDOMAIN}/testing
{"error": "Sorry, an error occurred while retrieving your key."}
Ah, the key doesn't show up. This is because our two regions are completely separate from each other. Each has their own Lambda compute and their own DynamoDB data store.
While these separate regions allow for fast queries around the globe, it also results in a segmented experience for users. We want the data to be shared, so a user gets a fast, consistent experience at any point on earth.
DynamoDB Global Tables
Enter: DynamoDB Global Tables.
This feature, announced at AWS re:Invent 2017, allows you to specify DynamoDB tables in separate regions to act as a single table. Writes in one region will be asynchronously replicated to the other regions.
This allows for some powerful applications without writing custom syncing logic.
To set up a Global Table, there are a few requirements. First, the tables must have the same name in different regions. Second, both tables must be entirely empty. This means we'll need to clear out any existing items in our table.
If you have Items in your table, use the script below to clean them out. You'll need to run it for each region that has a table with Items in it:
$ aws dynamodb scan --table-name keyvalues --region us-west-2 | \
 jq -c '.Items[] | { key } ' |
 tr '\n' '\0' | \
 xargs -0 -n1 -t aws dynamodb delete-item --table-name keyvalues --region us-west-2 --key
Once your tables are cleared out, then we can run the command to create a global table using the AWS CLI:
$ aws dynamodb create-global-table \
    --global-table-name keyvalues \
    --replication-group RegionName=us-west-2 RegionName=eu-central-1 \
    --region us-west-2
You will get a response indicating that the table is being created:
{
    "GlobalTableDescription": {
        "GlobalTableStatus": "CREATING",
        "GlobalTableName": "keyvalues",
        "ReplicationGroup": [
            {
                "RegionName": "us-west-2"
            },
            {
                "RegionName": "eu-central-1"
            }
        ],
        "CreationDateTime": 1516220398.243,
        "GlobalTableArn": "arn:aws:dynamodb::488110005556:global-table/keyvalues"
    }
}
Now our tables will be synced together, so writes from one region will be replicated to another region.
Let's test it out. Save a key in the US region:
$ curl -X POST ${USDOMAIN}/testing -d '{"value": "It worked"}'
{"key": "testing", "value": "It worked", "region": "us-west-2"}
Then retrieve it in the EU region:
$ curl -X GET ${EUROPEDOMAIN}/testing
{
  "key": "testing",
  "value": "It worked",
  "writeRegion": "us-west-2",
  "readRegion": "eu-central-1"
}
Nice, it worked. We can read the key in a different region. Note that the response from the getKey method includes the region in which the key was written (us-west-2) as well as the region from which we're currently reading (eu-central-1).
We can also use our custom domain to retrieve the key from whichever region is closest:
$ curl -X GET https://keyvalue.serverlessteam.com/testing
{
  "key": "testing",
  "value": "It worked",
  "writeRegion": "us-west-2",
  "readRegion": "us-west-2"
}
This read from the us-west-2 region as I'm located in the US, but it would read from the eu-central-1 region for those closer to that region.
Frontend client
To this point, we've been using curl and the terminal for calling our API. If you want a more visual approach, Alex Casalboni created a visual frontend for interacting with the backend. It allows you to write to and read from specific regions, while also showing the latency of your requests:
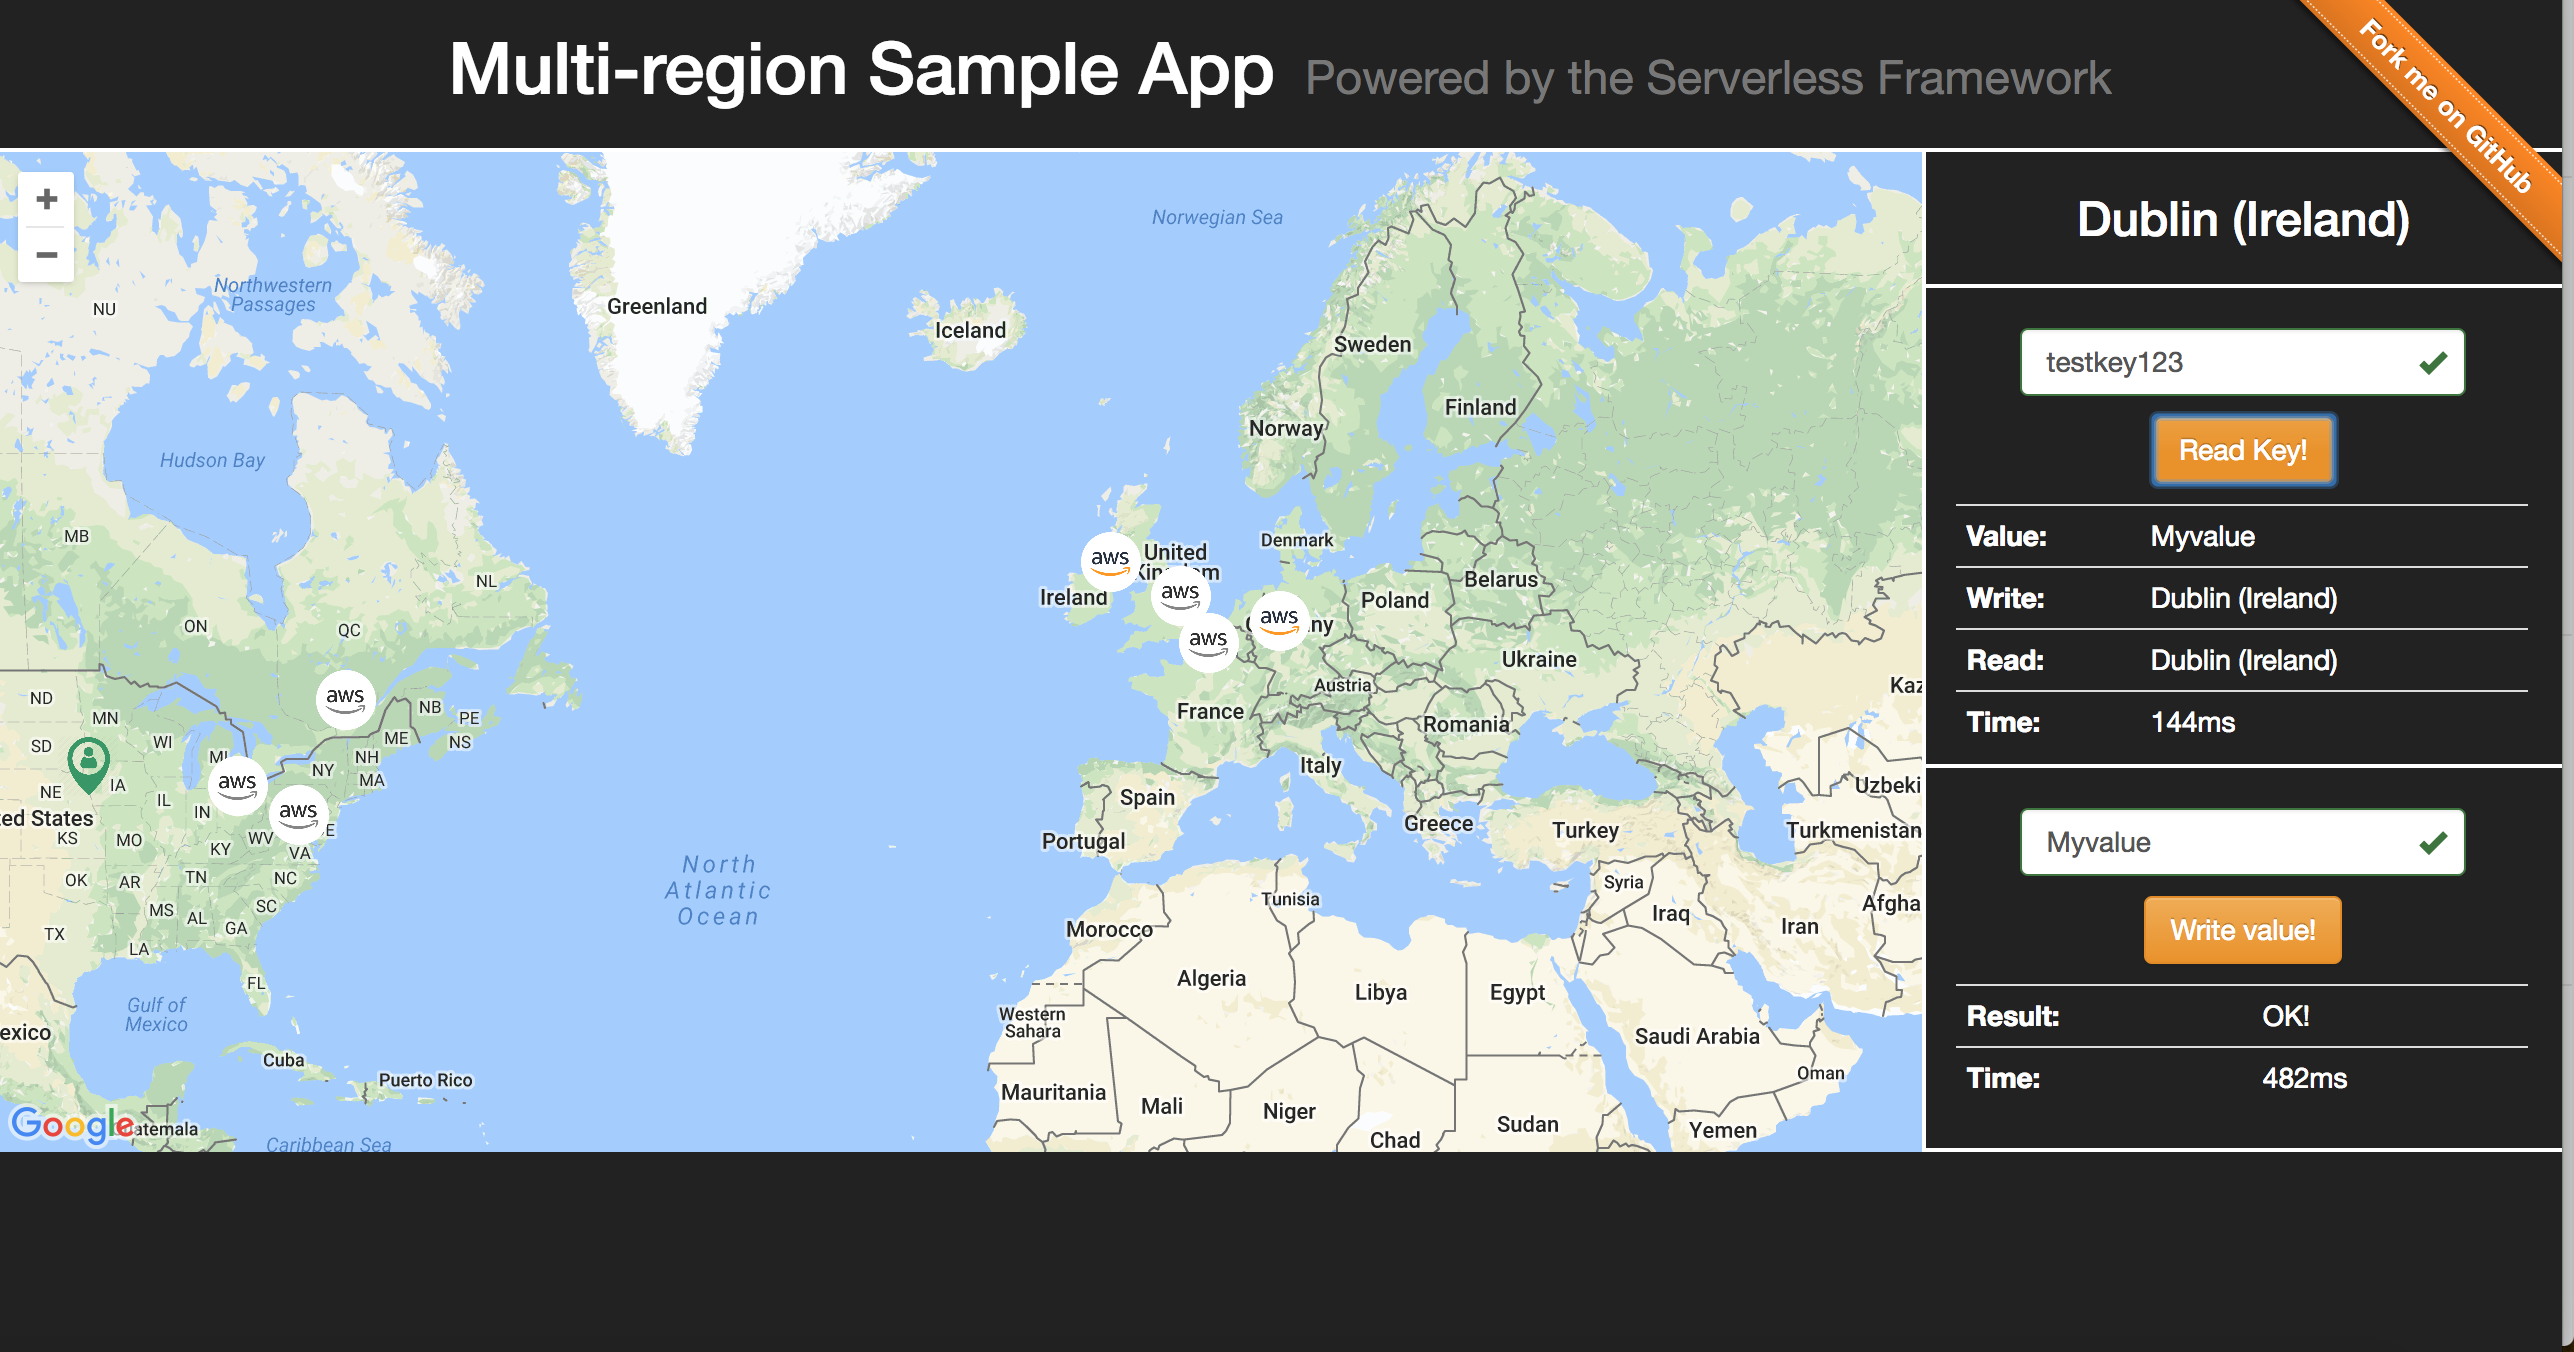
Check it out and run it yourself!
Miss the DynamoDB global tables webinar?
Follow @goserverless on twitter or sign up for our bi-monthly newsletter (via the lefthand menu) to stay on top of serverless industry news.


